Trip Recorder Using JavaScript’s Geolocation API and Google Maps
I recently saw Ben Nadel’s blog post that did a great job of introducing the built in browser support for geolocation. I have been meaning to write an iPhone client to collect and save GPS data as part of the Truck Tracker project. However, this browser-based location services have the advantage that I can write on web-client and it can be used on any browser that supports the API. This post will explore creating a stand-alone (no integration with Truck Tracker) prototype.
Below is a link to the demo page. The demo application is contained in a single file (all the CSS, JavaScript and HTML) to help facilitate ‘view source’ investigation. This page is optimized to render well on small screens and allow for touch based navigation. In other words, browsing to this page using a desktop client may hurt your eyes….you’ve been warned.
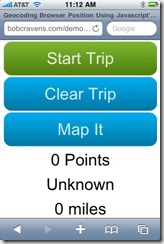
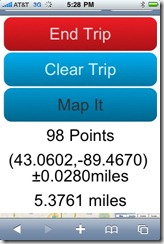
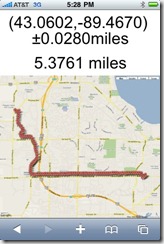
Before looking at the code, here are a few screen shot from the application on an iPhone:
The image on the left is a screen shot showing the application as it looks right after being loaded. Pressing the “Start Trip” button begins the collection of GPS points and transitions the application to the middle image. Status (number of points, current lat/long with accuracy, and distance traveled) is being updated while points are collected. My iPhone was capable of a sub-second acquisition rate. However, the code (see below) only stores points that are further than 0.05 miles from the last point. This prevents data piling up at long stop lights. Pressing the “End Trip” button will stop the collection of data points and will display the “Start Trip” button. You can then restart collection on the same trip of clear the data by pressing the “Clear Trip” button. The “Map It” button renders the GPS points on a map using the Google Maps version 3 API.
HTML
The markup for this application is shown below:
<div id="ctrls">
    <a id="toggle" href="#" class="uiElem button green">Start Trip</a>
    <a id="reset" href="#" class="uiElem button blue">Clear Trip</a>
    <a id="map" href="#" class="uiElem button blue">Map It</a>
    <div id="count" class="uiElem">0 Points</div>
    <div id="location" class="uiElem">Unknown</div>
    <div id="distance" class="uiElem">0 miles</div>
</div>
<div id="mapContainer">
    <!-- This is where Google map will go. --->
</div>
The first ‘div’ is a container for the controls and the status information. The three buttons are anchor tags. The status is shown using three ‘div’ elements. The last ‘div’ is the map container.
CSS
Shown below are the styles used:
html,
body {
    height: 100% ;
    margin: 0;
    padding: 0;
    width: 100% ;
}
#mapContainer {
    height: 80% ;
    width: 100% ;
}
#ctrls{
    margin: 10px;
}
.uiElem {
    font: 100px/100% Arial, Helvetica, sans-serif;
    margin: 10px 10px;
    padding: 20px;
    text-align: center;
}
/* CSS3 Gradient Buttons http://www.webdesignerwall.com/tutorials/css3-gradient-buttons/ */
/* button */
.button {
    display: block;
    outline: none;
    cursor: pointer;
    text-align: center;
    text-decoration: none;
    padding: .5em 2em .55em;
    text-shadow: 0 1px 1px rgba(0,0,0,.3);
    -webkit-border-radius: .5em;
    -moz-border-radius: .5em;
    border-radius: .5em;
    -webkit-box-shadow: 0 1px 2px rgba(0,0,0,.2);
    -moz-box-shadow: 0 1px 2px rgba(0,0,0,.2);
    box-shadow: 0 1px 2px rgba(0,0,0,.2);
}
.button:hover {
    text-decoration: none;
}
.button:active {
    position: relative;
    top: 1px;
}

/* red */
.red {
    color: #faddde;
    border: solid 1px #980c10;
    background: #d81b21;
    background: -webkit-gradient(linear, left top, left bottom, from(#ed1c24), to(#aa1317));
    background: -moz-linear-gradient(top,  #ed1c24,  #aa1317);
    filter:  progid:DXImageTransform.Microsoft.gradient(startColorstr='#ed1c24', endColorstr='#aa1317');
}
.red:hover {
    background: #b61318;
    background: -webkit-gradient(linear, left top, left bottom, from(#c9151b), to(#a11115));
    background: -moz-linear-gradient(top,  #c9151b,  #a11115);
    filter:  progid:DXImageTransform.Microsoft.gradient(startColorstr='#c9151b', endColorstr='#a11115');
}
.red:active {
    color: #de898c;
    background: -webkit-gradient(linear, left top, left bottom, from(#aa1317), to(#ed1c24));
    background: -moz-linear-gradient(top,  #aa1317,  #ed1c24);
    filter:  progid:DXImageTransform.Microsoft.gradient(startColorstr='#aa1317', endColorstr='#ed1c24');
}
/* blue */
.blue {
    color: #d9eef7;
    border: solid 1px #0076a3;
    background: #0095cd;
    background: -webkit-gradient(linear, left top, left bottom, from(#00adee), to(#0078a5));
    background: -moz-linear-gradient(top,  #00adee,  #0078a5);
    filter:  progid:DXImageTransform.Microsoft.gradient(startColorstr='#00adee', endColorstr='#0078a5');
}
.blue:hover {
    background: #007ead;
    background: -webkit-gradient(linear, left top, left bottom, from(#0095cc), to(#00678e));
    background: -moz-linear-gradient(top,  #0095cc,  #00678e);
    filter:  progid:DXImageTransform.Microsoft.gradient(startColorstr='#0095cc', endColorstr='#00678e');
}
.blue:active {
    color: #80bed6;
    background: -webkit-gradient(linear, left top, left bottom, from(#0078a5), to(#00adee));
    background: -moz-linear-gradient(top,  #0078a5,  #00adee);
    filter:  progid:DXImageTransform.Microsoft.gradient(startColorstr='#0078a5', endColorstr='#00adee');
}
/* green */
.green {
    color: #e8f0de;
    border: solid 1px #538312;
    background: #64991e;
    background: -webkit-gradient(linear, left top, left bottom, from(#7db72f), to(#4e7d0e));
    background: -moz-linear-gradient(top,  #7db72f,  #4e7d0e);
    filter:  progid:DXImageTransform.Microsoft.gradient(startColorstr='#7db72f', endColorstr='#4e7d0e');
}
.green:hover {
    background: #538018;
    background: -webkit-gradient(linear, left top, left bottom, from(#6b9d28), to(#436b0c));
    background: -moz-linear-gradient(top,  #6b9d28,  #436b0c);
    filter:  progid:DXImageTransform.Microsoft.gradient(startColorstr='#6b9d28', endColorstr='#436b0c');
}
.green:active {
    color: #a9c08c;
    background: -webkit-gradient(linear, left top, left bottom, from(#4e7d0e), to(#7db72f));
    background: -moz-linear-gradient(top,  #4e7d0e,  #7db72f);
    filter:  progid:DXImageTransform.Microsoft.gradient(startColorstr='#4e7d0e', endColorstr='#7db72f');
}
/* END CSS3 Gradient Buttons */
First, a quick and dirty CSS reset is used to help normalize the rendering from the various browsers. Then the mapping container is sized and a bit of margin is added to the controls container. The ‘uiElem’ style is used to set the font size, margins, and padding appropriate for use on small screens that are ‘touch’ driven. In other-words big buttons for my big fingers.
There are no images (except the Google Maps tiles) used to style the above markup. Instead, I am using CSS3 gradients to render the buttons. The folks a Web Design Wall have provided some amazing styles.
JavaScript
The JavaScript is where the application springs to life. There is no ‘server-side’ code backing any of this functionality. First you will need to include the following ‘script’ tags:
<script type="text/javascript" src="http://ajax.googleapis.com/ajax/libs/jquery/1.4.2/jquery.min.js"></script>
<script type="text/javascript" src="http://maps.google.com/maps/api/js?sensor=false"></script>
The first loads in jQuery and the second enables access to the Google mapping API.
var pts = [];               // All the GPS points
var distIndex = 1;          // Index for distance calculation
var totalDistance = 0.0;    // Total distance travelled
var currentLat = 0.0;       // Current latitude
var currentLng = 0.0;       // Current longitude
var accuracy = 0.0;         // Current accuracy in miles
var minDistance = 0.05;     // Minimum distance (miles) between collected points.
var isStarted = false;      // Flag tracking the application state.
var map = null;             // The map
var markers = [];           // Container for the map markers
var positionTimer;          // The id of the position timer.
The above globals are used to store application data and track state. Next we look at the event handlers for the three buttons (start/stop, reset, and map it).
$("#toggle").click(function(evt){
    evt.preventDefault();
    if(!isStarted){
        $(this).html("End Trip").removeClass("green").addClass("red");
        startGps();
        isStarted = true;
    }else{
        $(this).html("Start Trip").removeClass("red").addClass("green");
        stopGps();
        isStarted = false;
    }
});
$("#reset").click(function(evt){
    evt.preventDefault();
    if(confirm("Clear the data?")){
        pts = [];
        distIndex = 1;
        totalDistance = 0.0;
        currentLat = 0;
        currentLng = 0;
        accuracy = 0;
        updateStatus();
        clearMarkers();
    }
})
$("#map").click(function(evt){
    evt.preventDefault();
    showPoints();
})
The first event handler is for the ‘start/stop’ button. The most important thing happening here is the GPS collection is either started or stopped. There is also a bit of dynamic styling to add a visual indication of the application’s state. The ‘reset’ button simply deletes the collected points, resets the global variables, and updates the UI by calling the ‘updateStatus’ and ‘clearMarkers’ functions (below). Finally, the ‘map it’ button calls the ‘showPoints’ method to display the points on the map.
The JavaScript for updating the status is shown below:
function updateStatus(){
$("#count").html(pts.length + " Points");
$("#location").html("(" + currentLat.toFixed(4) + "," + currentLng.toFixed(4) + ") <br />±" + accuracy.toFixed(4) + "miles");
for(var i=distIndex;i<pts.length;i++){
totalDistance += distance(
pts[i-1].coords.latitude,
pts[i-1].coords.longitude,
pts[i].coords.latitude,
pts[i].coords.longitude
);
}
distIndex = pts.length;
$("#distance").html(totalDistance.toFixed(4) + " miles");
}
There is a loop that accumulates the distance of unprocessed (using the ‘distIndex’ variable) points. The distance (in miles) is calculated using the following implementation of the Haversine formula:
function distance(lat1, lng1, lat2, lng2) {
   var radius = 3956.0; // miles

   var deltaLat = ToRadians(lat2 - lat1);
   var deltaLng = ToRadians(lng2 - lng1);
   var sinLat = Math.sin(0.5*deltaLat);
   var sinLng = Math.sin(0.5*deltaLng);
   var cosLat1 = Math.cos(ToRadians(lat1));
   var cosLat2 = Math.cos(ToRadians(lat2));
   var h1 = sinLat*sinLat + cosLat1*cosLat2*sinLng*sinLng;
   var h2 = Math.sqrt(h1);
   var h3 = 2*Math.asin(Math.min(1, h2));
   var distance = radius*h3;
   return distance;
}

function ToRadians(degree) {
   return (degree * (Math.PI / 180));
}
Next are the start and stop functions that control the collection of GPS data.
function startGps(){
   // Check to see if this browser supports geolocation.
   if (navigator.geolocation) {

       positionTimer = navigator.geolocation.watchPosition(
           function( position ){
               if(position.coords.accuracy/609.344>0.5){    // 609.344 meters per mile
                   // First point has low accuracy (cell phone or IP geolocation)
                   // Ignore all low accuracy points.
                   return;
               }
               var dist = distance(currentLat, currentLng, position.coords.latitude, position.coords.longitude);
               if(dist<minDistance){
                   // Ignore points that are within a certain distance to the last point.
                   return;
               }

               pts.push(position);

               // Track current position
               accuracy = position.coords.accuracy/609.344; // 609.344 meters per mile
               currentLat = position.coords.latitude;
               currentLng = position.coords.longitude;

               // Update the status
               updateStatus();
           },
           function( error ){
               console.log( "Something went wrong: ", error );
           },
           {
               timeout: (60 * 1000),
               maximumAge: (1000),
               enableHighAccuracy: true
           }
       );

   } else {
       alert("Your browser does not support geo-location.");
   }
}

function stopGps(){
   navigator.geolocation.clearWatch(positionTimer);
   positionTimer = null;
}
For more details on the browser geolocation API check out the specification. The ‘watchPosition’ function behaves like the JavaScript ‘setInterval’ function and defines a continuous loop for collecting GPS data.
The first bit of logic inside the ‘watchPosition’ callback function determines if the accuracy of the collected point is good enough. The 0.5 mile tolerance was heuristically calculated using my iPhone. The first couple of points can be quite inaccurate. They are probably early estimates of position using either cell phone tower technology or IP lookup.
Next we determines if the new point is far enough away from the last collected point to be processed. This prevents the accumulation of points at long stop lights. If the point passes this filter, it is added to the collection, the current location data is set and the status is updated.
The JavaScript that creates and displays the points is shown next.
var mapContainer = $( "#mapContainer" );
map = new google.maps.Map(
    mapContainer[ 0 ],
    {
        zoom: 1,
        center: new google.maps.LatLng(
            0,
            0
        ),
        mapTypeId: google.maps.MapTypeId.ROADMAP
    }
);

function showPoints(){
    clearMarkers();
    if(pts.length==0){
        map.setCenter(new google.maps.LatLng(0,0));
        map.setZoom(1);
        return;
    }
    var maxLat = -500.0;
    var minLat = 500.0;
    var maxLng = -500.0;
    var minLng = 500.0;
    for(var i=0;i<pts.length;i++){
        var lat = pts[i].coords.latitude;
        var lng = pts[i].coords.longitude;
        if(lat>maxLat){maxLat = lat;}
        if(lat<minLat){minLat = lat;}
        if(lng>maxLng){maxLng = lng;}
        if(lng<minLng){minLng = lng;}
        addMarker(lat, lng);
    }
    if(maxLat==minLat){
        maxLat += 0.5;
        minLat -= 0.5;
    }
    if(minLng==maxLng){
        minLng -= 0.5;
        maxLng += 0.5;
    }
    var sw = new google.maps.LatLng(minLat, minLng);
    var ne = new google.maps.LatLng(maxLat, maxLng);
    var bounds = new google.maps.LatLngBounds(sw, ne);
    map.fitBounds(bounds);
}

function clearMarkers(){
    for(var i=0;i<markers.length;i++){
        marker[i].setMap(null);
        marker[i] = null;
    }
    markers = [];
}

function addMarker( latitude, longitude, label ){
    var marker = new google.maps.Marker({
        map: map,
        position: new google.maps.LatLng(
            latitude,
            longitude
        ),
        title: (label || "")
    });
    markers.push(marker);
}
The map is created when the page loads. When the ‘Map It’ button is pressed, the ‘showPoints’ function is called. That function first clears any current markers from the map and does a quick check for the no data case. If there is data, it loops over all the collected points and adds a marker to the map for each point. Inside this loop, the min/max latitude and longitude are collected. Finally, the map is zoomed to fit the collected points.
Summary
As our mobile devices become equipped with GPS receivers the mobile browsers are exposing API to access this data. The future will see more location aware applications. I believe geo-fencing will become very common.


Useful info. Fortunate me I discovered your web site by chance, and I’m surprised why this coincidence didn’t took place earlier! I bookmarked it.
Thanks for your guides. it’s really helpful. and i’m studying Java Reader too. that’s also helpful.
thanks for your wonderful efforts its really a good job .
You are some genius bro. Thanks for this
Please tell me that how can I download the source to explore.
The demo has all the code. There is not server side code for this example.
hi rcravens,
sorry for my inconvenient,
I have downloaded the TruckTracker, but I have a problem with login OpenId, i use my gmail account and _openid.GetResponse() return null. I modified the code to call create user with method CreateUser(response.ClaimedIdentifier, firstName, lastName, email) but is it has error on the users table users. do you have the users table for TruckTracker?
Hey there, You’ve done a great job. I’ll certainly
digg it and personally suggest to my friends.
I am confident they will be benefited from this site.
Bob, awesome work on the project! Would love to see any updates if you have done anything with this. I am specifically interested in your experience with iPhone browser restriction to run JS in the background, if you manged to find workaround, when phone is idle black screen, or browser is minimized the JS will stop running, hens the Trip Recorder will stop recording.
Also have you looked at or done anything with speed calculation?
Thanks again for great work and sharing it with the world !
It’s amazing for me to have a site, which is beneficial designed for
my experience. thanks admin
I don’t do comments but i had to on this article. You just saved me a ton of googling. Thank you so much.
Is it possible to change to meters instead of miles? I want to track the walking distance of user from one point to another.
How to do you draw the points as a route instead of showing all the points on the map?